
Table of Contents
Tired of the endless cycle of shaving, waxing, or plucking? You're not alone. Many of us dream of consistently smooth skin without the constant effort or the expense of salon treatments. At-home laser hair removal devices offer a tempting alternative, promising significant hair reduction right from your bathroom.
Getting Ready: Prepping for the Best Way to Use At Home Laser Hair Removal
Getting Ready: Prepping for the Best Way to Use At Home Laser Hair Removal
Clean Skin is Non-Negotiable
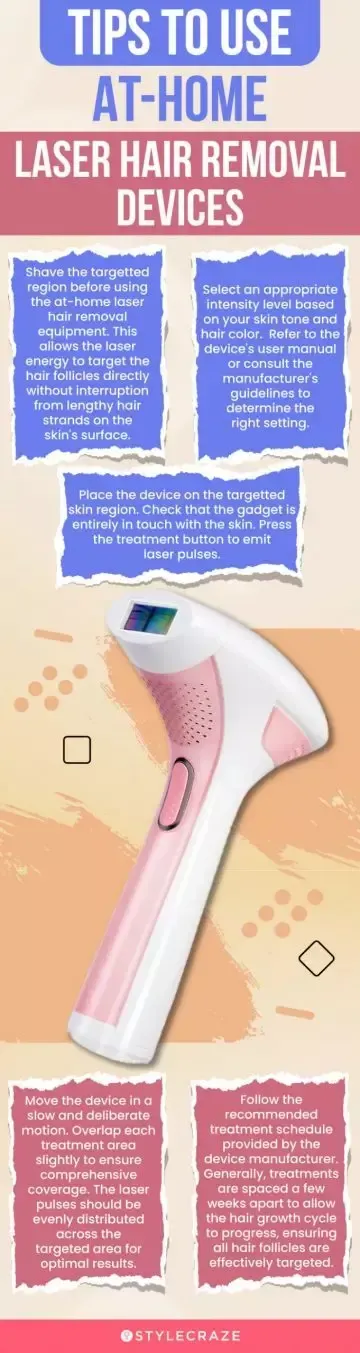
Look, you wouldn't paint a wall without cleaning it first, right? The same logic applies to your skin when you're aiming for the **best way to use at home laser hair removal**. Any lotion, oil, deodorant, or even residual soap can interfere with the device's ability to target the hair follicle effectively. It can block the light, reducing the treatment's power, and worse, it can heat up on the skin's surface, causing irritation or even burns. Think of your skin as a blank canvas; it needs to be completely clean and dry before that device even gets close. A simple wash with soap and water is usually enough, followed by a thorough drying. No shortcuts here.
Shave, Don't Wax or Pluck
This is where some people get confused. You might think removing the hair completely is the goal before treatment, but that's actually counterproductive for laser or IPL devices. These technologies work by targeting the pigment (melanin) in the hair root. If you wax or pluck, you rip the hair out from the root, leaving nothing for the light energy to absorb. Shaving, however, cuts the hair at the skin's surface, leaving the root intact below. This is precisely what you need. Shave the area you plan to treat within 24 hours before your session. Any longer, and the hair might grow too long above the skin, leading to surface burns rather than targeting the root. Any shorter, and the skin might still be slightly irritated from the shave itself.
Key Prepping Steps:
- Cleanse the skin thoroughly.
- Ensure skin is completely dry.
- Shave the treatment area within 24 hours.
- Do NOT wax, pluck, or use depilatory creams.
- Avoid applying lotions, oils, or deodorants afterward.
Patch Test and Sun Avoidance
Before you go zapping large areas, you absolutely must do a patch test. Every device is different, and everyone's skin reacts uniquely. Find a small, inconspicuous area you plan to treat (like a small spot on your leg) and use the device on a low setting according to the instructions. Wait 24-48 hours. Check for excessive redness, swelling, blistering, or significant pain. If you see anything concerning beyond mild, temporary redness, this device might not be right for you, or you might need a lower setting. Just as critical is sun exposure. Tanned skin contains more melanin, making it more susceptible to absorbing the device's energy, which can cause burns. Avoid direct sun exposure on the treatment area for at least two weeks before and throughout your treatment course. If you can't avoid sun, use a high SPF sunscreen religiously.
Device Deep Dive: Choosing & Understanding Your Tool for At Home Hair Removal

Device Deep Dive: Choosing & Understanding Your Tool for At Home Hair Removal
IPL vs. Laser: What's the Difference Anyway?
so you've decided to ditch the razor, but now you're faced with a bunch of devices labeled "laser" or "IPL." What's the deal? Think of it like this: true laser devices use a single, concentrated wavelength of light to target the melanin in the hair follicle specifically. They are often more precise and can sometimes be more effective on certain hair types. IPL (Intense Pulsed Light), on the other hand, uses a broad spectrum of light wavelengths. It's less targeted but can treat larger areas faster. Most devices marketed for home use are actually IPL, not true lasers, because they are generally safer and easier for consumers to use without professional training. Both work by heating the hair follicle to damage it and inhibit future growth, but the technology behind the light pulse is different.
Finding Your Match: Skin Tone, Hair Color, and Device Compatibility
This is probably the most critical part of choosing your device, and where many people get into trouble. These devices work best on light to medium skin tones with dark hair. Why? Because the light energy is absorbed by the pigment (melanin). If you have very dark skin, your skin has a lot of melanin, which can absorb too much energy from the device, leading to burns, blistering, or pigmentation changes. If you have very light hair (blonde, red, grey, white), there isn't enough melanin in the hair follicle for the light to target effectively, meaning the treatment won't work well, if at all. Always check the device's compatibility chart for skin tones and hair colors before buying. A good resource like hairawaybylaser.com often provides clear guides on which devices suit which profiles.
Skin Tone (Fitzpatrick Scale) | Hair Color | Likely Effectiveness |
|---|---|---|
I (Very Fair) - IV (Light Brown) | Dark Blonde, Brown, Black | Good to Excellent |
V (Dark Brown) | Dark Brown, Black | Use with extreme caution; device must be specifically designed for darker skin. |
VI (Very Dark Brown/Black) | Black | Generally not suitable; high risk of skin damage. |
Any | Blonde, Red, Grey, White | Generally not effective. |
Know Your Device: Reading the Manual Isn't Optional
Seriously, I know it's tempting to just plug it in and go, but the user manual is your best friend here. Every device has its own quirks, safety features, and recommended usage patterns. You need to understand things like the different intensity levels (start low!), how often to treat (usually every 1-2 weeks initially), and specific instructions for different body areas. Some devices have sensors that won't flash if the skin tone is too dark or if the contact isn't flush with the skin – understand what these indicators mean. Knowing your device inside and out is key to using it safely and achieving the results you're hoping for. Don't rush this step.
Mastering the Technique: The Best Way to Use At Home Laser Hair Removal StepbyStep
Mastering the Technique: The Best Way to Use At Home Laser Hair Removal StepbyStep
Getting Down to Business: The Treatment Session
Alright, you've prepped the skin, you've patch-tested, and you understand your device. Now for the main event: the actual treatment session. This is where knowing the **best way to use at home laser hair removal** really makes a difference. Start by making sure the device window is clean – tiny hairs or debris can interfere. Position the device flat against the skin, ensuring full contact. Most devices have a sensor that prevents flashing if it's not making proper contact. Once it's flush, press the activation button. You'll see a flash of light and likely feel a warm sensation, maybe a slight snap, like a rubber band hitting your skin. This is normal. Lift the device and move it to the next adjacent area, overlapping slightly to avoid missing spots, but not so much that you're treating the same area multiple times in one session, which can cause irritation. Work systematically across the area you're treating. Don't rush it; consistency and thoroughness are key here.
What to Expect: Results, Side Effects, and Consistency in At Home Hair Removal
Managing Your Expectations: When Will You See Results?
you've done a session. Now you're staring in the mirror, expecting miracles, right? Let's pump the brakes a little. At-home devices aren't a one-and-done deal. Think of it more like a marathon than a sprint. You likely won't see a drastic change after just one or two sessions. What usually happens is the hair in the treated area starts to grow back slower, maybe a bit finer or patchier. People often report seeing a noticeable reduction in hair growth after about 4-6 treatments, consistently applied according to the device's schedule. Full, significant results – where you're talking about potentially 70-90% reduction – can take anywhere from 6 to 12 months, sometimes even longer, depending on the device, your hair type, and how diligent you are with your treatments. Patience is absolutely key here if you want the **best way to use at home laser hair removal** to actually work for you.
Dealing with the Downsides: Possible Side Effects
While generally safe when used correctly, these devices aren't entirely without potential side effects. The most common one is temporary redness or a mild warm sensation right after treatment, similar to a slight sunburn. This usually fades within a few hours. Some people might experience slight swelling around the hair follicles. Less common, but possible, side effects include temporary changes in skin pigmentation (lighter or darker spots), blistering, or crusting, especially if the device is used on too high a setting for your skin tone, or if you've had recent sun exposure. This is why that patch test is non-negotiable and why following the instructions for your specific device and skin type is so critical. If you experience anything beyond mild, temporary redness, stop using the device and consult the manual or a dermatologist.
Possible Side Effects:
- Temporary redness or warmth (most common)
- Mild swelling around follicles
- Temporary pigmentation changes (lighter/darker spots)
- Blistering or crusting (less common, often due to misuse)
- Itching
The Unsung Hero: Why Consistency is Everything
You can have the fanciest, most expensive device on the market, follow all the prep steps perfectly, and still not get the results you want if you aren't consistent. Hair grows in cycles (anagen, catagen, telogen). The light energy from these devices is most effective during the active growth phase (anagen), when the hair is still attached to the follicle and has plenty of melanin. Not all hairs are in this phase at the same time. By treating regularly, typically every 1-2 weeks initially, you increase the chances of hitting more hairs during their active growth cycle over time. Skipping sessions or doing them too far apart means you're missing those crucial windows. It's like trying to weed a garden but only showing up once a month – you'll never really get ahead. Stick to the recommended treatment schedule your device provides. That consistency is arguably the most important factor in achieving long-term hair reduction.
Tips for Success: Ensuring the Best Way to Use At Home Laser Hair Removal Pays Off

Tips for Success: Ensuring the Best Way to Use At Home Laser Hair Removal Pays Off
Tips for Success: Ensuring the Best Way to Use At Home Laser Hair Removal Pays Off
Getting the most out of your at-home hair removal device isn't just about zapping away randomly; it's about a strategic approach. The real secret weapon, beyond the device itself, is your commitment. You need to treat regularly, according to the schedule your device recommends, even when you're not seeing dramatic results immediately. Think of it as building momentum; each session contributes to damaging more follicles over time. Don't increase the intensity level just because you're impatient; stick to what feels comfortable and safe for your skin type. Protecting your treated skin from the sun is also non-negotiable throughout this process. Seriously, sunscreen is your best friend here to avoid pigmentation issues. Following these steps consistently is truly the **best way to use at home laser hair removal** and see that hard-earned reduction you're aiming for.
- Maintain a consistent treatment schedule.
- Be patient; results take time and multiple sessions.
- Always use the device at a comfortable, safe intensity.
- Strictly avoid sun exposure on treated areas.
- Follow your device's specific instructions precisely.
Achieving Lasting Smoothness with At Home Laser Hair Removal
So, you've got the device, you know how to prep, and you're ready to zap. Remember, the journey to reduced hair growth with at-home laser hair removal isn't an overnight sprint; it's more of a consistent jog. You'll see results over time, not instantly. It requires patience, sticking to the schedule, and paying attention to how your skin responds. By following the steps outlined here – proper preparation, correct usage, and consistent application – you're giving yourself the best shot at achieving the smooth skin you want. It might not be salon-perfect from day one, but with the right approach, it's a viable path to less hair and more confidence.