Table of Contents
Spot infection signs before removal.
Dark red skin, yellow-green pus, hot throbbing pain, or swelling over 1cm means see a doctor.
Never squeeze infected tissue.
Use warm compresses at 110°F for 15 minutes.
Apply compresses four times daily for two days.
Sterilize tools with alcohol or boiling water.
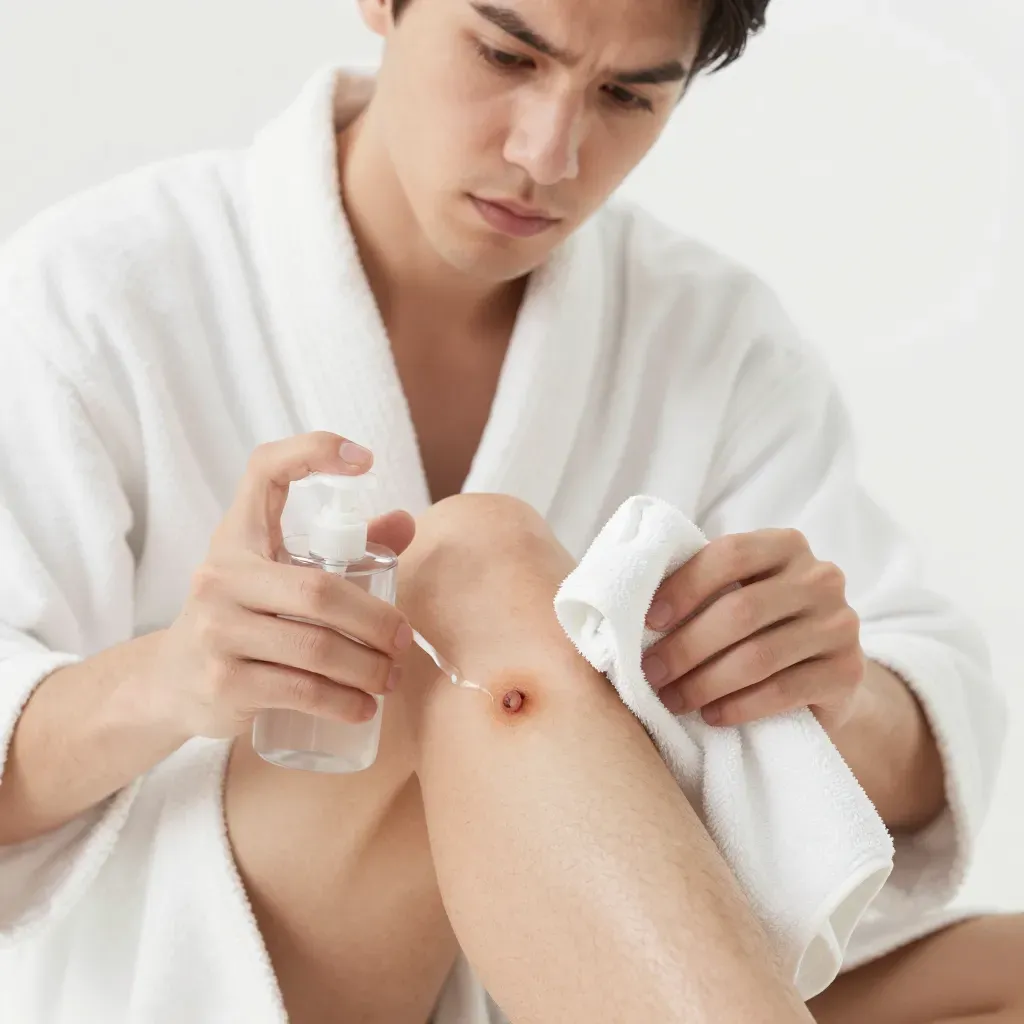
Clean skin with benzoyl peroxide and povidone-iodine.
Extract at night after shower when pores stay open.
After removal, apply antiseptic and cover with sterile bandage for 24 hours.
Monitor healing daily for infection signs.
Prevent future ingrown hairs by exfoliating every other day.
Shave with the grain using sharp single-blade razors.
Moisturize daily within three minutes post-shower.
Wear loose cotton clothing.
Seek medical help if redness spreads beyond half inch.
See doctor if pain worsens after 48 hours, pus appears, or fever develops.
Diabetics and immunocompromised need earlier care.
Laser hair removal permanently prevents recurrence.
Question | Answer |
|---|---|
How do I spot an infected ingrown hair? | Look for dark red skin, yellow-green pus, hot throbbing pain, swelling over 1cm, or spreading redness. |
What temperature should warm compresses be? | Heat water to 110°F and apply for 15 minutes, four times daily for two days. |
When should I see a doctor? | Seek care if redness spreads beyond half inch, pain worsens after 48 hours, pus appears, fever develops, or you have diabetes or weakened immunity. |
How do I prevent future ingrown hairs? | Exfoliate every other day, shave with the grain using sharp razors, moisturize daily, and wear loose cotton clothing. |
What is the best permanent solution? | Laser hair removal permanently destroys follicles and eliminates ingrown hairs. |
Spot infection signs before removing big ingrown hairs.
Visual Red Flags
Examine the bump appearance before any home treatment.
Safe for Home Removal | Requires Medical Care |
|---|---|
Small red bump only | Dark red or purple skin |
Single ingrown hair visible | Multiple pus pockets present |
Mild tenderness when pressed | Hot throbbing sensation |
No surrounding swelling | Bump larger than 1cm wide |
Clear or white fluid | Thick yellow-green pus |
Systemic Infection Symptoms
- Low-grade fever or chills
- Red streaks moving away from bump
- Pain increasing each day
- Area feels warm without touch
- Nearby lymph nodes swollen
- Bump doubles size within 48 hours
- General fatigue or malaise
High-Risk Body Locations
Face, groin, and underarm ingrown hairs infect quickly due to higher bacteria levels. Bikini line bumps worsen from tight clothing friction and trapped moisture. Brazilian laser hair removal eliminates this issue permanently by destroying hair follicles at the root.
Stop All Home Removal Attempts
Never dig or squeeze infected tissue. This action drives bacteria deeper into skin layers and guarantees permanent scarring.
Seek immediate medical treatment for proper antibiotics and sterile drainage procedures. After complete healing, consider laser hair removal to prevent recurrence. Laser technology destroys follicles permanently so hairs cannot regrow inward. Wait minimum two weeks after infection clears before starting laser sessions. Individuals with curly or coarse hair face highest ingrown hair risk and see maximum benefit from professional laser treatment.
Prep skin with warm compresses and sterilize tools.
Warm Compress Protocol
Heat water to 110°F. Soak washcloth. Wring out excess. Apply to bump for 15 minutes. Reheat every 3 minutes. Repeat 4 times daily for 2 days minimum. Heat softens skin and draws hair to surface. Never use boiling water. It burns skin and creates more inflammation. Add 1 teaspoon Epsom salt to reduce swelling.
Tool Sterilization Methods
Tool Type | Sterilization Method | Required Time | Alternative |
|---|---|---|---|
Slanted tweezers | Wipe with 70% alcohol pass through flame | 30 seconds | Autoclave if available |
Lancet needle | Boil in rolling water | 10 minutes | Use single-use sterile packet |
Cuticle scissors | Soak in 70% alcohol solution | 5 minutes | Dispose after use |
Cotton pads | Use sealed sterile packets only | N/A | Never use bathroom cotton |
Buy disposable sterile lancets from pharmacy. Never reuse tools between different hairs. Wash hands with antibacterial soap for 60 seconds before touching tools. Keep tools on sterile tray during procedure. Do not place on bathroom counter.
Skin Cleansing Steps
- Wash area twice with benzoyl peroxide 5% wash
- Rinse with lukewarm running water
- Pat dry with sterile gauze pad
- Apply thin layer of povidone-iodine antiseptic
- Wait 10 minutes for complete air drying
- Do not apply moisturizer before extraction
Timing Strategy
Schedule extraction at night after hot shower. Pores stay open 30 minutes post-shower. Night allows 8 hours undisturbed healing. Avoid exercise swimming or makeup 24 hours before. Plan 3 days after shaving when hair length is optimal. Laser hair removal eliminates this prep permanently by destroying follicles at root level. No more compresses sterilization or extractions needed.
Treat area after to prevent infection
Clean immediately
Wash hands thoroughly with soap and warm water for 20 seconds.
Rinse extraction site gently with warm water and mild antibacterial soap.
Pat dry using sterile gauze pad or clean fresh towel.
Avoid rubbing scrubbing or applying pressure to sensitive site.
Let air dry for one minute before applying treatment.
Apply antiseptic treatment
Dab area with 70% rubbing alcohol using cotton swab or clean gauze pad.
Alternatively apply hydrogen peroxide once only to avoid tissue irritation.
Spread thin layer of OTC antibiotic ointment like bacitracin neomycin or polysporin.
Natural option: apply diluted tea tree oil mixed with carrier oil like coconut oil.
Let treatment absorb for two minutes before covering.
Cover and protect
Place small sterile adhesive bandage directly over site for first 24 hours.
Change bandage every 12 hours or immediately if becomes wet dirty or loses adhesion.
After 24 hours remove bandage to let area breathe and speed healing.
Wear loose breathable cotton clothing to prevent friction irritation and moisture.
Avoid friction from tight waistbands or athletic gear.
Monitor healing signs daily
Normal Healing | Infection Warning |
|---|---|
Mild redness for 24-48 hours maximum | Redness spreading beyond half inch around |
Slight tenderness when touched | Increasing pain after day two |
Small scab forms within 24 hours | Yellow or green pus discharge |
Mild itch during days 3-5 | Area feels warm to touch or swollen |
Heals completely in 5-7 days | Fever chills or red streaks from site |
Avoid contamination sources
- Touching area with unwashed dirty hands
- Applying makeup lotion or heavy creams directly on site
- Swimming in pools hot tubs or oceans for minimum 48 hours
- Shaving over or near area until fully healed and smooth
- Exposing to direct sunlight for first few days post-removal
- Wearing tight synthetic fabrics that trap sweat and bacteria
Seek medical care immediately when
Contact healthcare provider if redness spreads beyond half inch diameter.
Seek professional care if pain intensifies not improves after 48 hours.
Get immediate medical attention for any pus cloudy discharge or foul odor.
Go to emergency room if you develop fever chills or see red streaks.
People with diabetes compromised immunity poor circulation or taking blood thinners should consult doctor at first sign of infection.
Prevent future ingrown hairs daily
Exfoliate consistently
Exfoliate target areas every other day with gentle circular motions to remove dead skin cells.
- Apply chemical exfoliants containing salicylic acid or glycolic acid 2-3 times weekly
- Use soft washcloth or fine sugar scrub on alternate days for physical exfoliation
- Avoid harsh scrubs with large particles that damage skin barrier and cause inflammation
- Focus on high-risk zones: bikini line underarms legs beard area and inner thighs
- Reduce frequency if skin shows signs of irritation or increased sensitivity
Shave correctly
Soak skin in warm water 3-5 minutes before shaving to soften hair follicles.
- Apply thick shaving cream or gel to create protective barrier between blade and skin
- Shave in direction of hair growth using sharp clean single-blade razor only
- Rinse blade after every stroke to prevent clogging and bacterial buildup
- Limit to two passes maximum per area to reduce skin trauma
- Replace disposable razors after 5-7 uses or immediately if dull rusty or dropped
- Consider safety razor for cleaner cut with less irritation
Moisturize daily
Apply fragrance-free moisturizer within 3 minutes post-shower when skin remains slightly damp.
- Choose non-comedogenic lotions containing ceramides or hyaluronic acid
- Avoid heavy greasy products that clog pores and trap growing hairs
- Reapply moisturizer before bed to maintain skin hydration overnight
- Skip scented products that contain alcohol and irritate shaved skin
Wear right clothing
- Select loose-fitting cotton underwear and breathable natural fabrics daily
- Avoid tight leggings compression shorts or synthetic materials that create friction
- Change out of sweaty workout clothes within 30 minutes post-exercise
- Wash new clothing before first wear to remove chemical finishes and irritants
- Skip tight jeans or synthetic fabrics in ingrown-prone areas
Choose proper products
Product Type | Recommended | Avoid |
|---|---|---|
Shaving cream | Fragrance-free hydrating formula with aloe | Aerosol foams containing alcohol |
Moisturizer | Ceramide hyaluronic acid based lotion | Heavy petroleum jelly or cocoa butter |
Exfoliant | 2% salicylic acid 5% glycolic acid serum | Large nut shells or plastic beads |
Razor | Single blade safety razor | Dull multi-blade cartridges |
Aftershave | Witch hazel or tea tree oil toner | Alcohol-based splashes |
Switch to electric trimmer for sensitive areas instead of close shaving.
Apply ingrown hair prevention serum with witch hazel or tea tree oil daily to high-risk zones.
Stop using comedogenic products that block hair follicles and cause bumps.
Know when medical help needed
Recognize infection signs immediately
Seek Doctor Within 24 Hours | Go to Emergency Room Now |
|---|---|
Redness spreads beyond half inch diameter | Fever chills or body aches develop |
Pain worsens after 48 hours instead of improving | Red streaks radiate from bump |
Yellow green or bloody pus drains from site | Swelling doubles in size within hours |
Area feels hot hard or firm to touch | Difficulty moving nearby joints |
Bump grows larger than pea size | Confusion dizziness or rapid heart rate |
High-risk individuals need earlier care
- People with diabetes must contact doctor at first sign of infection
- Those with weakened immune systems from chemotherapy HIV or steroids
- Individuals with poor circulation or peripheral artery disease
- Patients taking blood thinners who experience bleeding
- Anyone with history of MRSA or recurrent skin infections
- Pregnant women with ingrown hairs near surgical scars or C-section sites
When home treatment fails
See physician if ingrown hair remains after three days of proper home care.
Schedule appointment if same spot develops ingrown hairs repeatedly.
Consult dermatologist if you get multiple ingrown hairs weekly despite prevention.
Request medical evaluation if large painful cyst forms deeper under skin.
Get professional help if ingrown hair occurs in sensitive areas like eyelids or genitals.
What medical treatment involves
Doctor makes small sterile incision to drain pus and remove hair completely.
Prescribes topical antibiotic cream for mild infections or oral antibiotics for severe cases.
May inject corticosteroid to reduce inflammation for large painful cysts.
Performs professional extraction using sterile tools under local anesthesia.
Recommends laser hair removal for chronic recurrent ingrown hairs in same area.
Prepare for medical appointment
- Note when ingrown hair first appeared and all treatments tried
- List current medications allergies and medical conditions
- Take temperature before appointment if infection suspected
- Photograph progression to show doctor visual timeline
- Bring all products used on area for ingredient review