Table of Contents
Deep ingrown hairs cause painful firm bumps under skin.
Home removal risks infection, scarring, abscesses.
Sterilize tools 10 min boiling.
Wash area twice with antibacterial soap.
Apply warm compress.
Use needle at 30° to expose hair loop.
Pull with tweezers following growth direction.
Apply antiseptic and hydrocolloid bandage.
Stop for severe pain, spreading redness, fever, pus.
Never remove from face triangle, genitals, underarms.
Diabetics and immunocompromised need doctors.
See professional after 7 days no improvement.
Question | Answer |
|---|---|
How do you identify deep ingrown hairs? | Painful firm bump persists weeks with visible hair loop under skin. |
What are the biggest removal risks? | Infection, permanent scarring, hyperpigmentation, abscesses. |
How do you sterilize tools? | Boil metal tools 10 minutes or soak in alcohol 20 minutes. |
When should you see a doctor? | Stop for spreading redness, fever, pus, severe pain, or no improvement after 7 days. |
Which areas forbid home removal? | Face triangle, genitals, underarms, and never if diabetic or immunocompromised. |
Learn to identify deep ingrown hairs and understand removal risks.
Spot deep ingrown hair signs
Deep ingrown hair removal at home requires recognizing true depth. These hairs embed completely under skin surface growing sideways instead of outward. Key indicators: painful firm bump persisting weeks visible hair loop or shadow beneath translucent skin tender nodule without whitehead dark post-inflammatory spot and occasional yellow pus if infected. Unlike superficial ingrowns deep ones resist popping and feel like small marbles under skin. They often occur in areas with coarse hair or frequent shaving.
Understand serious extraction risks
Home removal dangers multiply with depth. Unsterile tools introduce bacteria directly into wound. Digging with needles causes permanent scarring. Repeated trauma triggers dark marks lasting months. Aggressive squeezing ruptures follicles inward creating painful abscesses. Wrong angle damages surrounding tissue and creates more ingrowns. Risk increases tenfold in sensitive areas like face bikini line and underarms.
Risk Factor | Consequence | Prevention |
|---|---|---|
Dirty tools | Staph infection | Autoclave or boil tools 10 min |
Deep digging | Atrophic scars | Stop if hair not visible |
Repeated tries | Hyperpigmentation | One attempt per week max |
Excessive force | Abscess formation | Apply warm compress instead |
Wrong technique | More ingrowns | Follow hair growth direction |
Know when to stop immediately
Certain signs demand professional intervention. Increasing redness spreading beyond bump warmth radiating from site throbbing pain that worsens red streaks moving outward fever or ingrown larger than pea size all require medical attention. Facial and bikini line ingrowns scar easily. Diabetics and immunocompromised individuals should never attempt home removal. Waiting too long turns simple problem into surgical case.
Prepare your skin and sterilize tools before extraction.
Cleanse skin properly
Wash target area twice with antibacterial soap. First wash removes surface dirt. Second wash kills bacteria. Use warm water 3-5 minutes to open pores. Pat dry with clean paper towel. Never use cloth towels. Apply 70% isopropyl alcohol or chlorhexidine. Let air dry completely. Do not touch cleaned area.
Sterilize extraction tools
Boil metal tools 10 minutes at rolling boil. Use pressure cooker for true sterilization. Alternative: soak in 70% isopropyl alcohol 20 minutes. Flame sterilize needle tips until glowing red. Cool on sterile surface. Use new sterile gloves. Wash hands 30 seconds if no gloves. Dispose single-use items immediately.
Tool | Method | Time | Common Error |
|---|---|---|---|
Tweezers | Boiling water | 10 min | Quick rinse only |
Needle | Flame + alcohol | 30 sec + 5 min | Wiping with tissue |
Finger bowls | Alcohol soak | 20 min | Sharing between uses |
Gloves | New sterile pack | 0 min | Reusing gloves |
Set up sterile workspace
Work in bright clean area away from bathroom humidity. Cover surface with fresh paper towels. Use bright overhead lighting. Position magnifying mirror. Keep tools on sterile metal tray. Have backup antiseptic ready. Set 5-minute timer. Keep phone nearby for emergencies.
Gather post-care supplies
- Sterile gauze pads for bleeding control
- Antiseptic ointment (bacitracin)
- Hydrocolloid bandage for protection
- Ice pack in sterile gauze
- Gentle cleanser for next day
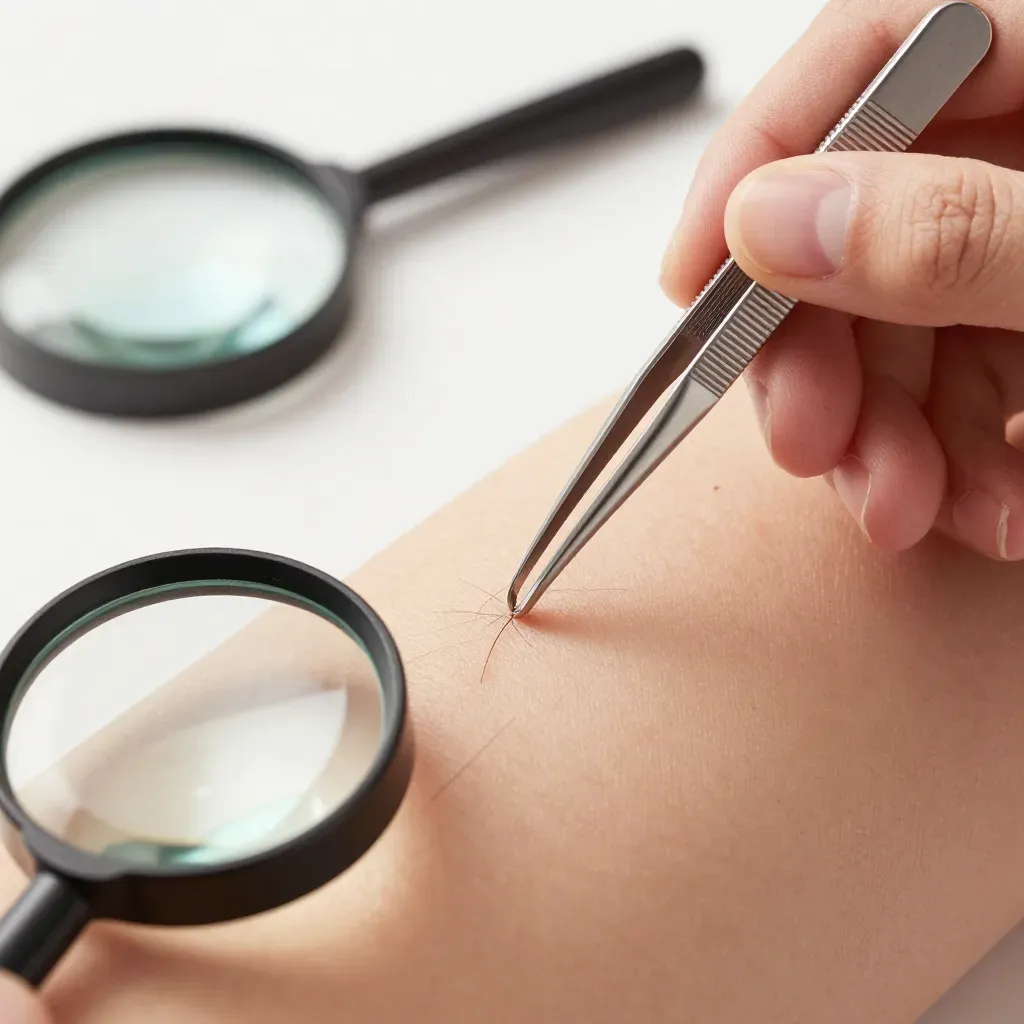
Extract the hair carefully using sterile tweezers or needles.
Apply warm compress first
Place hot damp cloth on bump for 5-7 minutes. Repeat 3 times. This softens skin and brings hair closer to surface. Test temperature first to avoid burns. Pat dry with sterile gauze. Compress reduces trauma during extraction. Do not skip this step.
Use needle to expose hair loop
Hold sterile needle at 30-degree angle. Gently lift skin flap covering hair. Never dig or stab. Make tiny opening just above hair loop. Work in good lighting. Stop if you hit resistance. You should see hair within 60 seconds. Abort if not.
Grasp and pull with tweezers
Position tweezers parallel to skin surface. Grab hair loop firmly at base. Pull straight out following growth direction. Use steady slow motion. Do not yank. Remove entire hair shaft including bulb. Check bulb intact after removal. Broken hair regrows ingrown.
Critical safety checkpoints
Check depth every 30 seconds. Stop if bleeding exceeds few drops. You went too deep. Severe pain signals wrong technique. Stop immediately. Stop if redness spreads. Infection starting. Set timer before starting. Observe site 24 hours.
What to do if hair not visible
Apply warm compress daily for 3 days. Use chemical exfoliant with salicylic acid. Let skin heal before retry. Never force extraction. Consider professional help if persists after 7 days.
Action | Right Way | Wrong Way | Risk |
|---|---|---|---|
Needle angle | 30 degrees gentle lift | 90 degrees stab | Scarring |
Pull direction | With hair growth | Against hair growth | Broken hair |
Force level | Steady gentle pressure | Hard yank | Torn follicle |
Time limit | 2 minutes max | Keep digging | Infection |
Tool reuse | Clean between each use | Use same tool | Cross-contamination |
Lighting | 10x magnification | Dim bathroom | Missed hair |
Apply antiseptic treatment and soothing care after removal.
Stop bleeding immediately
Press sterile gauze firmly for 2 minutes. Check after full time. Heavy bleeding after 5 minutes means seek medical help.
Apply antiseptic treatment
Dab povidone-iodine with cotton swab. Cover entire area. Air dry 30 seconds. Apply thin bacitracin layer. Avoid neomycin.
Cover and protect
Place hydrocolloid bandage on site. Change every 24 hours. Keep dry 12 hours minimum. Avoid friction. Never leave open.
Soothe inflammation
Ice pack in sterile gauze 10 minutes every 2 hours first day. Take ibuprofen. Do not touch area.
Monitor for complications
Check twice daily. Normal: slight redness mild tenderness clear fluid. Warning: increasing pain spreading redness yellow pus fever. Photo document daily.
Aftercare timeline
Time | Action | Avoid |
|---|---|---|
0-24h | Keep dry change bandage | Water makeup sweat |
24-48h | Gentle cleanse reapply ointment | Scrub exfoliants |
3-5 days | Air exposure | Tight clothing |
1 week | Resume normal routine | Shaving over site |
Product list
- Use: sterile saline fragrance-free cleanser plain petroleum jelly
- Avoid: alcohol hydrogen peroxide witch hazel essential oils scrubs
Healing milestones
Days 1-2: redness peaks. Days 3-4: scab forms. Days 5-7: skin closes. Week 2: mark fades. Dark spots 4-6 weeks. Picking increases scar risk.
Recognize when professional medical intervention is necessary.
Identify emergency red flags
Seek immediate care for: spreading redness beyond 1 inch red streaks severe throbbing pain skin feels hot fever over 100.4°F yellow-green pus swollen lymph nodes bump larger than pea. These signal serious infection. Facial infections spread to brain within hours. Genital infections cause permanent damage. Underarm infections affect lymph system.
Warning Sign | Required Action | Maximum Wait Time | What Happens If You Wait |
|---|---|---|---|
Spreading redness | Urgent care visit | Same day | Cellulitis develops |
Fever develops | ER immediately | 2 hours | Blood infection |
Pus draining | Doctor appointment | 24 hours | Abscess formation |
No change after 7 days | Dermatologist | 1 week | Permanent scar |
Never remove from these locations
Face triangle between nose corners - infection reaches brain. Genital area - severe scarring risk. Underarms near lymph nodes - systemic infection. Anywhere with dense nerve endings - permanent nerve damage. These spots scar badly and infect quickly.
Medical conditions that forbid home removal
Diabetes (poor healing high infection risk). Immunocompromised (sepsis danger). Blood disorders (excessive bleeding). Eczema or psoriasis (skin barrier broken). Accutane users (delayed healing). These patients need doctor for any ingrown no matter how small.
Professional treatments available
Sterile lancet extraction under magnification - no scarring. Prescription antibiotic ointments - mupirocin clindamycin. Corticosteroid injections - reduce swelling fast. Surgical excision for deep cysts - local anesthesia. Laser hair removal - prevents future ingrowns. Professional care costs less than fixing home mistakes.
Delay consequences
Waiting 48 hours: abscess forms needs drainage. 1 week: permanent scar guaranteed. 2 weeks: possible sepsis hospitalization. 1 month: surgical intervention required. Early treatment costs $100-200. Delayed treatment costs $1000-5000 plus lost work time.
Time Delayed | Complication Risk | Estimated Cost | Recovery Time |
|---|---|---|---|
48 hours | Abscess formation | $150-300 | 1 week |
1 week | Permanent scar | $500-1000 | 1 month |
2 weeks | Sepsis risk | $2000-5000 | 2 months |
1 month | Surgical drainage | $3000-8000 | 3 months |
Action timeline
- Day 1-2: Home care OK if no red flags
- Day 3-5: See doctor if still painful or growing
- Day 7: Professional needed if not healed
- Day 10: Emergency if worse in any way
When in doubt call doctor. Better safe than scarred. Most insurance covers urgent care visits. Telehealth works for initial assessment. Document with photos daily. Track symptoms in phone notes. Bring all info to appointment.