Table of Contents
Giant ingrown hairs exceed 5mm and create painful lumps lasting weeks
They occur when hair curls back into skin after shaving too close waxing or tight clothing
Curly hair faces highest risk
Home extraction only works when hair loops are visible
Sterilize tools with boiling or alcohol
Use warm compress then needle to lift hair
Pull slowly with tweezers following growth direction
Never dig or squeeze
Seek medical care for spreading redness fever or pus
Prevention requires shaving with the grain using single-blade razors
Exfoliate daily with salicylic acid
Wear loose cotton clothing
After removal apply antiseptic and keep area clean and dry for 7 days
Watch for bright red spreading increasing pain or thick pus as infection signs
Question | Answer |
|---|---|
What size qualifies as a giant ingrown hair | Giant ingrown hairs exceed 5mm diameter |
Can I remove giant ingrown hairs at home | Only attempt removal if hair loop is visible at surface |
When should I see a doctor for an ingrown hair | Seek care for spreading redness fever or pus |
What prevents giant ingrown hairs | Shave with the grain using single-blade razors and exfoliate daily |
How long does healing take after removal | Skin heals in 7-10 days with proper care |
Identify giant ingrown hairs and their causes
Giant ingrown hairs are severely embedded follicles that form large painful bumps under skin.
These occur when hair curls back or grows sideways into skin instead of outward.
Size distinguishes giant ingrown hairs from regular ones.
They exceed 5mm diameter and create visible lumps.
They develop deep inflammation extending beyond immediate area.
They often contain coiled hair masses trapped beneath surface.
They persist for weeks without natural resolution.
They frequently develop pus-filled cysts that require medical drainage.
They leave permanent scars if handled incorrectly.
Primary causes
Improper hair removal triggers most cases of giant ingrown hairs.
Shaving too close cuts hair at sharp angle that easily pierces surrounding skin tissue.
Waxing pulls hair against its natural growth direction causing breakage below surface level.
Tweezing leaves fragmented hair tips that cannot grow out properly.
Tight clothing creates constant friction that forces growing hairs to redirect inward.
Dead skin cell buildup creates physical barrier that traps emerging hairs underneath.
Oil and dirt clog follicle openings preventing normal hair exit.
Risk factors
Curly or coarse hair types face significantly higher risk for developing giant ingrown hairs.
Dry skin lacks proper lubrication for hair to break through surface smoothly.
Friction from workout gear traps hairs during sweating and movement.
Previous scarring disrupts normal follicle growth patterns permanently.
Genetic predisposition affects natural follicle shape and growth direction.
Hormonal fluctuations increase hair coarseness and accelerate growth speed.
Ethnicity plays role as African and Mediterranean descent have curlier hair patterns.
Visual identification guide
Feature | Giant Ingrown Hair | Regular Ingrown Hair |
|---|---|---|
Size | Over 5mm diameter | Under 3mm diameter |
Duration | 2+ weeks persistent | Few days temporary |
Pain level | Severe throbbing pain | Mild discomfort only |
Appearance | Large red inflamed lump | Small flesh-colored bump |
Contents | Visible coiled hair mass | Single straight hair |
Scarring risk | High potential for marks | Low potential |
Common body locations
Beard area plagues men who shave daily with multi-blade razors.
Bikini line troubles women who wax or shave against hair growth direction.
Legs develop them after shaving without proper exfoliation routine.
Underarms get them from deodorant friction and sweat buildup combination.
Pubic region suffers from naturally coarse curly hair texture.
Inner thighs experience chafing that redirects hair growth pattern.
Lower neck catches hairs from collared shirts rubbing against skin.
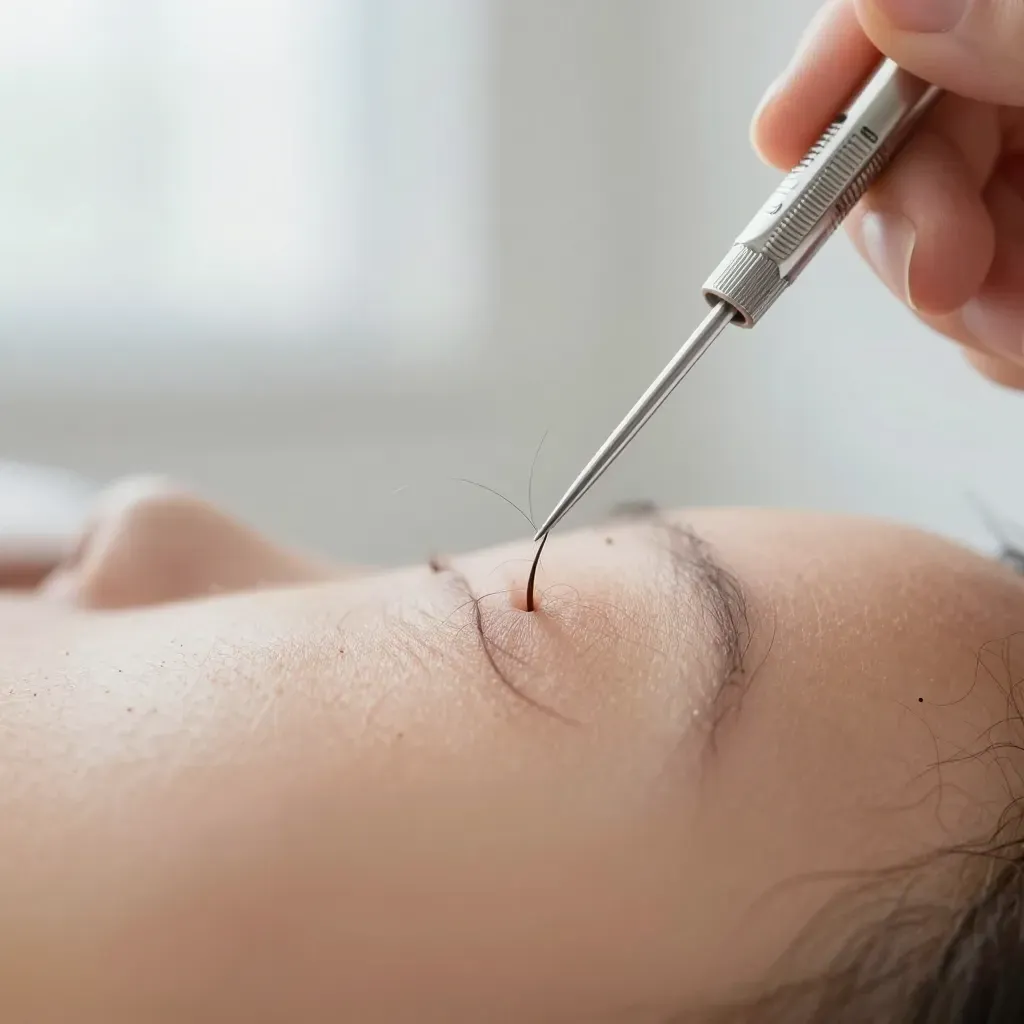
Extract large embedded hairs safely at home
When home extraction is safe
Only attempt removal if bump shows visible hair loop at surface.
Stop immediately if you see no hair or if lump feels hard deep under skin.
Do not proceed if area shows spreading redness, warmth, or severe pain.
Essential sterilization protocol
Boil all metal tools for 10 minutes or soak in rubbing alcohol for 5 minutes.
Wash hands thoroughly with antibacterial soap.
Cleanse skin area with alcohol wipes before and after procedure.
Use sterile gauze pads to avoid contamination.
Required tools
Tool | Purpose |
|---|---|
Sharp tweezers | Grasp and pull hair |
Sterile needle | Lift hair from skin |
Antiseptic | Prevent infection |
Warm compress | Open pores |
Step-by-step extraction
Apply warm compress for 10 minutes to soften skin and open pore.
Gently pierce skin surface with sterile needle at exact hair location.
Hook the visible hair loop using needle tip to lift slightly above skin.
Grasp lifted hair firmly with sterilized tweezers.
Pull hair out following its natural growth direction slowly.
Do not dig or squeeze surrounding tissue.
Aftercare
Apply antiseptic solution immediately after hair removal.
Cover with sterile bandage for first 24 hours.
Keep area clean and dry to prevent bacterial growth.
Avoid shaving or waxing until fully healed.
Stop and seek medical help if
Bleeding continues after 5 minutes of pressure.
Pain intensifies instead of improving.
Redness spreads beyond original bump area.
Pus increases or develops foul odor.
Fever develops within 24-48 hours.
Recognize when professional medical care is needed
Seek immediate medical attention
Redness spreads beyond 2 inches from bump center.
Swelling doubles in size within 24 hours.
Fever reaches 100.4°F or higher.
Pain becomes severe and throbbing.
Pus develops yellow-green color with foul smell.
Red streaks extend outward from lump.
Infection warning signs
Normal healing | Infection present |
|---|---|
Mild redness | Bright red spreading |
Decreasing pain | Increasing pain |
Clear fluid | Thick yellow pus |
No fever | Fever/chills |
When home treatment fails
No improvement after 7 days of proper care.
Hair remains trapped despite multiple attempts.
Bump reappears in same spot repeatedly.
Scar tissue forms over hair preventing exit.
Cyst formation requires doctor
Hard lump deeper than 1cm under skin surface.
No visible hair after 2 weeks of treatment.
Area feels warm and tight.
Multiple hairs trapped in single follicle.
High-risk patients need earlier care
Diabetics get infections faster and more severely.
Immunocompromised individuals cannot fight bacteria effectively.
Blood thinners increase bleeding risk during extraction.
History of MRSA raises complication probability.
Medical procedures available
Doctors use sterile scalpels for precise incision.
They apply local anesthesia for painless removal.
They prescribe antibiotic ointments and oral medications.
They perform corticosteroid injections for inflammation.
They utilize laser treatment for permanent prevention.
Prevent future giant ingrown hairs effectively
Hair removal best practices
Shave with grain only never against.
Use single-blade safety razors exclusively.
Replace blades every 3-5 uses maximum.
Apply thick shaving cream barrier liberally.
Leave 2-3mm hair length minimum.
Use electric trimmers with guard attachments.
Avoid waxing curly hair types completely.
Consider laser hair removal for permanent solution.
Space removal sessions 3-4 days minimum.
Exfoliation routine
Exfoliate daily with salicylic acid 2% solution.
Scrub 3x weekly with soft-bristled brush.
Apply chemical exfoliant 12 hours before removal.
Focus on beard line bikini inner thighs.
Stop exfoliation 24 hours after extraction.
Use gentle circular motions never scrub harsh.
Skin hydration strategy
Moisturize twice daily with non-comedogenic lotion.
Use glycolic acid 5% cream nightly.
Apply warm compress 5 minutes pre-removal.
Keep skin hydrated but not oily.
Avoid heavy creams on day of shaving.
Clothing friction reduction
Wear loose 100% cotton underwear daily.
Avoid tight jeans leggings compression.
Change sweaty workout clothes within 30 minutes.
Use talc-free powder in thigh groin areas.
Skip synthetic fabrics that trap heat.
Product selection guide
Use These Products | Avoid These Products |
|---|---|
Salicylic acid 2% | Alcohol-based toners |
Benzoyl peroxide 5% | Heavy pore-clogging oils |
Tea tree oil diluted | Fragranced irritants |
Non-comedogenic labels | Comedogenic ingredients |
Fragrance-free options | Physical scrubs with beads |
Post-removal healing protocol
Apply antibiotic ointment immediately after removal.
Use pure aloe vera gel for inflammation.
Keep hands completely off treated area.
Let skin rest 48 hours between sessions.
Wear loose clothing during healing period.
Care for skin after removal to prevent infection
Immediate post-removal care
Press sterile gauze on wound for 2 minutes minimum to stop bleeding.
Apply antiseptic solution directly to open follicle using cotton swab.
Cover with breathable bandage for first 4 hours only.
Elevate area if possible to minimize swelling and throbbing.
Take photo of area for daily comparison tracking.
24-hour cleaning protocol
Wash hands thoroughly with antibacterial soap before touching treated area every time.
Cleanse wound twice daily with mild fragrance-free soap and lukewarm water.
Pat dry with clean disposable paper towel never rub with cloth towel.
Reapply thin layer of antibiotic ointment after each cleaning session.
Change bandage every 6 hours minimum or whenever it becomes wet.
Dispose of used bandages in sealed plastic bag.
48-hour maintenance
Remove bandage after 24-48 hours if wound shows no drainage.
Continue twice daily cleaning routine for full 7 days minimum.
Apply thin layer of petroleum jelly for moisture barrier protection.
Wear loose 100% cotton clothing only no synthetics.
Keep area completely dry except during cleaning times.
Sleep on clean sheets changed daily.
Infection warning signs comparison
Normal healing signs | Infection warning signs |
|---|---|
Mild pinkness around wound | Bright red spreading outward |
Decreasing tenderness daily | Increasing pain after day 3 |
Small dry scab formation | Yellow crust oozing pus |
No swelling beyond bump | Swelling growing larger |
Clear fluid only | Thick yellow-green pus |
No fever | Fever over 100.4°F |
Healing timeline expectations
Days 1-2: Redness and mild swelling completely normal.
Days 3-5: Scab forms and pain level drops significantly.
Days 7-10: Scab naturally falls off revealing new pink skin.
Day 14: Skin should appear normal color and texture.
Month 1-3: Scar fades from red to skin tone.
Recommended healing products
Neosporin Original antibiotic ointment applied thin layer.
Petroleum jelly as moisture barrier alternative.
Tea tree oil diluted 1:10 with coconut oil.
Hydrocolloid bandages for deep or draining wounds.
Silicone gel sheets for scar prevention after full healing.
Vitamin E oil only after wound closes completely.
Activities to avoid during healing
No swimming pools hot tubs or beaches for 7 full days.
Avoid gym workouts that cause heavy sweating.
Skip direct sun exposure until fully healed.
Do not pick scratch or peel scabs ever.
Delay shaving or waxing area for 2 weeks minimum.
Avoid sexual activity if wound is in bikini area.
When to call doctor immediately
Redness spreads beyond 1 inch from wound center.
Pain worsens instead of improving after day 3.
Fever develops reaching 100.4°F or higher.
Keloid scar starts forming raised thick tissue.
Healing stops progressing after 7 days.
Red streaks appear moving away from wound.