Table of Contents
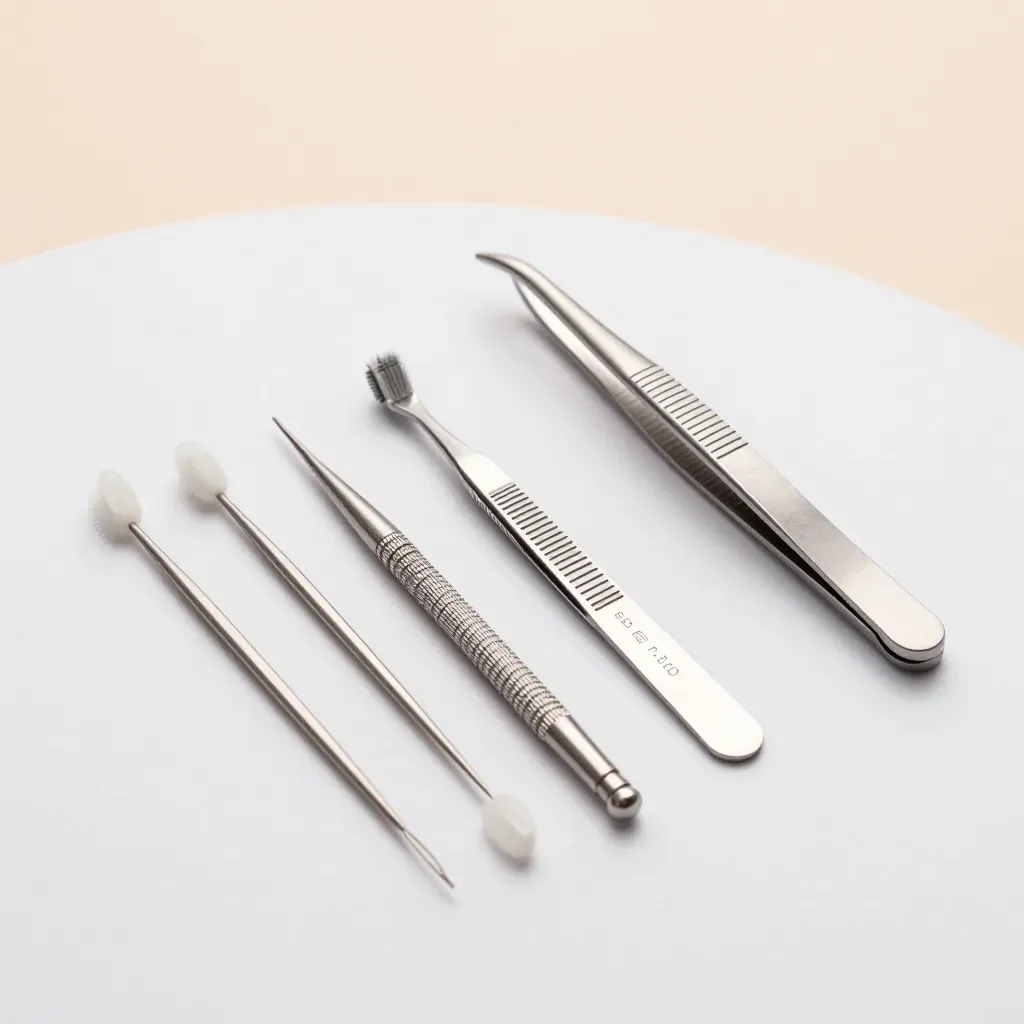
Ingrown hair extraction kits bundle tweezers needles and exfoliating tools
Pointed tweezers remove fine facial hairs slanted tweezers handle coarse body hairs
Single-use sterile lancet needles lift deeply trapped hairs
Exfoliating brushes prevent future ingrown hairs by removing dead skin cells
Sterilize tools with alcohol before and after each use
Cleanse skin with antibacterial wash and apply warm compress to open pores
Lift hair with needle parallel to skin then pull with tweezers in growth direction
Never squeeze or dig into skin to avoid scarring
Exfoliate daily and moisturize within three minutes of bathing to prevent recurrence
See professional for infection signs like pus severe pain spreading redness or fever
Clean tools with alcohol after every use and replace regularly
Replace tweezers every six to twelve months needles after single use brushes every three to six months
td> What is the correct extraction technique?
Kits include tweezers, needles, and exfoliating tools.
Ingrown hair extraction kits bundle specialized tools. Each serves a specific purpose.
Precision tweezers
Tweezers grip and pull embedded hairs. Stainless steel prevents rust. Sharp aligned tips are essential. Pointed tips work for fine facial hairs. Slanted tips handle coarse body hairs.
- Disinfect with alcohol before and after each use
- Pull hair in its growth direction
- Apply gentle steady pressure
- Never dig into skin
Lancet needles
Needles lift deeply trapped hairs. Single-use sterile lancets prevent infection. 18-gauge suits most hairs. 20-gauge works for finer hairs.
- Clean skin with antiseptic first
- Insert needle parallel to skin
- Lift hair gently
- Discard after one use
Exfoliating brushes and scrubs
Exfoliating tools prevent future ingrown hairs. They remove dead skin cells. Silicone brushes suit sensitive areas. Bristle brushes work for body skin. Chemical exfoliants dissolve buildup.
Tool | Best For | Key Feature | Usage |
|---|---|---|---|
Pointed Tweezers | Fine facial hair | Sharp precision tips | As needed |
Slanted Tweezers | Coarse body hair | Strong grip | As needed |
Lancet Needle | Deep ingrown | Sterile sharp point | Single use |
Silicone Brush | Sensitive skin | Gentle bristles | Daily |
Bristle Brush | Body areas | Firm exfoliation | 2-3x weekly |
Quality kits include a storage case. Replace tools when tips dull. Never share personal extraction tools.
Sterilize tools then gently lift and extract the hair.
Tool sterilization
Disinfect tools before every use. Bacteria on tweezers cause infections and worsen ingrown hairs.
Method | Instructions | Effectiveness | Warning |
|---|---|---|---|
Alcohol soak | Submerge in 70% isopropyl alcohol for 5 minutes | Kills 99% bacteria | Let air dry completely |
Boiling water | Boil metal tools for 10 minutes at 212°F | Removes all microbes | Cool before touching skin |
Flame sterilization | Pass through flame 3 times quickly | Kills surface bacteria | Can damage tool finish |
- Wash tools with antibacterial soap first to remove debris
- Rinse thoroughly to eliminate soap residue
- Dry completely with clean towel to prevent rust formation
- Store in sealed sterile pouch or container
- Replace tools when tips become dull or misaligned
- Never share personal extraction tools
Skin preparation
Soft skin releases trapped hairs easier. Proper prep reduces pain and prevents damage.
- Wash hands thoroughly with antibacterial soap for 30 seconds
- Cleanse target area with gentle antibacterial wash
- Apply warm compress for 5-10 minutes to open pores
- Pat dry with clean microfiber towel
- Wipe area with antiseptic solution like witch hazel or tea tree oil
- Wait 2 minutes for skin to dry completely
- Consider topical numbing cream for highly sensitive areas
Extraction technique
- Position needle parallel to skin surface at 10-15 degree angle
- Slide tip carefully under hair loop without puncturing skin
- Lift upward gently to expose trapped hair tip
- Switch to sterilized tweezers once hair is accessible
- Grasp hair as close to base as possible for firm grip
- Pull slowly and steadily in direction of hair growth
- Apply gentle pressure to surrounding skin if needed
- If resistance occurs, stop and try again after 24 hours
- Apply antiseptic solution immediately after extraction
- Cover with breathable bandage if area is irritated
Work under bright light. Use magnifying mirror for precision. Clean hair from tweezers between each attempt.
Exfoliate daily and moisturize to prevent recurrence.
Daily exfoliation routine
Exfoliation removes dead skin cells that block hair follicles. Physical exfoliants use friction. Chemical exfoliants dissolve buildup.
Type | Product | Frequency | Best For |
|---|---|---|---|
Physical | Silicone brush, sugar scrub | Daily (gentle) | Body skin |
Chemical AHA | Glycolic acid 5-10% | 2-3x weekly | Face, sensitive areas |
Chemical BHA | Salicylic acid 2% | Daily (mild) | Oily, acne-prone skin |
- Exfoliate before shaving or waxing to release trapped hairs
- Use gentle circular motions for 30 seconds maximum
- Rinse with lukewarm water, never hot
- Never exfoliate broken or inflamed skin
- Increase frequency gradually to avoid irritation
- Focus on areas prone to ingrown hairs: bikini line, underarms, beard
Moisturizing after extraction
Apply moisturizer within 3 minutes of bathing. Look for non-comedogenic formulas that won't clog pores. Water-based products absorb faster.
- Hyaluronic acid: Draws moisture into skin, plumps surface
- Glycerin: Softens skin barrier, allows hairs to break through
- Ceramides: Repairs skin protection, reduces inflammation
- Aloe vera: Soothes irritation, cools redness
- Tea tree oil: Prevents bacterial growth in follicles
- Centella asiatica: Calms post-extraction sensitivity
Lightweight lotions for face. Thicker creams for body. Avoid fragrances on sensitive areas. Reapply twice daily if skin feels tight.
Long-term prevention plan
Time | Action | Product | Tip |
|---|---|---|---|
Morning | Gentle cleanse | Mild face wash | Use lukewarm water |
Post-shower | Moisturize | Hydrating lotion | Apply on damp skin |
Evening | Chemical exfoliant | AHA/BHA serum | Start with low concentration |
Weekly | Deep exfoliation | Body scrub | Focus on problem areas |
Monthly | Replace tools | New brush/razor | Dull tools cause ingrown hairs |
- Wear loose breathable clothing after hair removal to reduce friction
- Change razor blades every 3-4 uses maximum, never reuse disposables
- Avoid tight synthetic fabrics that trap sweat and bacteria
- Consider laser hair removal for permanent reduction of hair growth
- Stay hydrated to maintain skin elasticity from within
- Shave with the grain, not against it
- Use shaving cream or gel to reduce irritation
See a professional for infected or deep ingrown hairs.
Warning signs you need professional help
DIY extraction risks scarring and infection. Some ingrown hairs require medical expertise.
DIY Extraction | Professional Treatment |
|---|---|
Surface-level hairs visible | Deep hairs buried under skin |
No pain or mild tenderness | Severe pain, swelling, pus |
Small bump | Large inflamed nodule |
No spreading redness | Red streaks, fever |
- Pus or yellow discharge indicates bacterial infection
- Red streaks spreading from bump signal serious infection
- Fever, chills accompany systemic infection
- Hair trapped for over 2 weeks won't surface
- Large painful lump under skin prevents hair escape
- Recurring ingrown hairs in same spot create scar tissue
- Dark skin patches or keloid scars form after previous attempts
What professionals do
Dermatologists and licensed aestheticians use sterile techniques and specialized equipment.
- Incision and drainage: Sterile blade opens abscess, releases trapped hair
- Chemical depilatories: Professional-strength creams dissolve hair without trauma
- Extraction tools: Medical-grade needles and forceps prevent skin damage
- Corticosteroid injections: Reduce inflammation in stubborn cases
- Antibiotic prescriptions: Treat bacterial infections systemically
- Laser hair removal: Permanent solution for recurring ingrown hairs
Treatment | Recovery Time | Cost Range |
|---|---|---|
Simple extraction | 1-2 days | $50-$150 |
Incision & drainage | 3-7 days | $100-$300 |
Oral antibiotics | 5-10 days | $30-$100 |
Laser treatment | Immediate | $150-$500/session |
Cost and when to seek help
Delaying professional care increases cost and scarring risk.
- Copays for dermatologist visits range $25-$75 with insurance
- Without insurance, consultation costs $100-$250
- Early treatment prevents expensive surgical scar revision later
- Recurrent ingrown hairs justify laser hair removal investment
- Many clinics offer payment plans for laser packages
Clean tools with alcohol after every use.
Why alcohol cleaning matters
Bacteria multiply on tools within hours. Alcohol kills 99% of pathogens in seconds. Dirty tools cause infections, scarring, and spread bacteria to other follicles. Cleaning takes 2 minutes. Infections take weeks to heal.
Step-by-step alcohol cleaning process
Step | Action | Time | Key Point |
|---|---|---|---|
1 | Rinse tools under hot water | 30 sec | Removes hair and debris |
2 | Wash with antibacterial soap | 60 sec | Scrub all surfaces |
3 | Rinse thoroughly | 30 sec | No soap residue left |
4 | Submerge in 70% isopropyl alcohol | 5 min | Covers entire tool |
5 | Air dry on clean paper towel | 10 min | Prevents contamination |
- Use 70% isopropyl alcohol, not 90% (70% kills more bacteria)
- Submerge tips completely
- Never wipe tools with used towels
- Let air dry naturally
- Clean immediately after use, not before next use
Alternative cleaning methods
Alcohol works best but alternatives exist. Boiling water sterilizes metal tools. UV sterilizers kill bacteria with light. Barbicide solution works for professional settings. Avoid bleach (corrodes metal). Avoid hydrogen peroxide (less effective).
Method | Pros | Cons | Best For |
|---|---|---|---|
70% Alcohol | Fast, effective, no damage | Flammable, need ventilation | Daily home use |
Boiling water | Completely sterilizes | Takes longer, can dull tools | Weekly deep clean |
UV sterilizer | Hands-free, no chemicals | Expensive, needs electricity | Multiple tools |
Barbicide | Professional grade | Harsh chemicals, rinsing required | Salon use |
Proper storage after cleaning
- Store in sealed container or sterile pouch
- Keep in cool dry place away from humidity
- Separate clean and dirty tools
- Use silica gel packets to absorb moisture
- Label container with last cleaning date
- Never store in bathroom (humidity breeds bacteria)
When to replace tools
Dull tools cause more damage than good. Replace tweezers when tips no longer align. Replace needles after single use. Replace brushes when bristles fray. Replace any tool that drops on floor. Replace tools every 6-12 months with regular use.
Tool | Replace When | Lifespan |
|---|---|---|
Tweezers | Tips misaligned or dull | 6-12 months |
Lancet needles | After each use | Single use |
Exfoliating brush | Bristles fray or smell | 3-6 months |
Storage case | Cracks or won't seal | 1-2 years |