Table of Contents
Get rid of ingrown armpit hair by understanding its causes.
Shaving and waxing often make hair grow back into skin.
This creates painful red bumps that can get infected.
Safely remove trapped hair using sterile tweezers after a warm compress.
Treat infections with topical creams and see a doctor for severe cases.
Prevent future ingrowns with proper shaving or try laser hair removal.
Question | Answer |
|---|---|
What is the main cause of ingrown armpit hair? | Improper shaving techniques create sharp hairs that grow back into the skin. |
How do I safely remove an ingrown hair? | Use clean, pointed tweezers to gently lift the hair loop out from under the skin. |
What helps an infected ingrown hair? | Apply a warm compress and topical antibiotic ointment to the bump several times a day. |
How can I prevent ingrown hairs from forming? | Always shave with the grain using a sharp, single-blade razor. |
Identify ingrown armpit hair causes and symptoms
Primary Causes
- Shaving: Cutting hair bluntly creates a sharp tip that easily pierces the skin as it grows back.
- Waxing or tweezing: Removing hair from the root causes regrowth with a finer, sharper point that can curl back.
- Dead skin cell buildup: Clogged follicles trap new hairs beneath the surface.
- Friction and pressure: Tight clothing or repetitive arm movement rubs hairs back into the skin.
- Hair type: Naturally curly or coarse hair has a natural tendency to curl back into the follicle.
Symptom Breakdown
Symptom | Description |
|---|---|
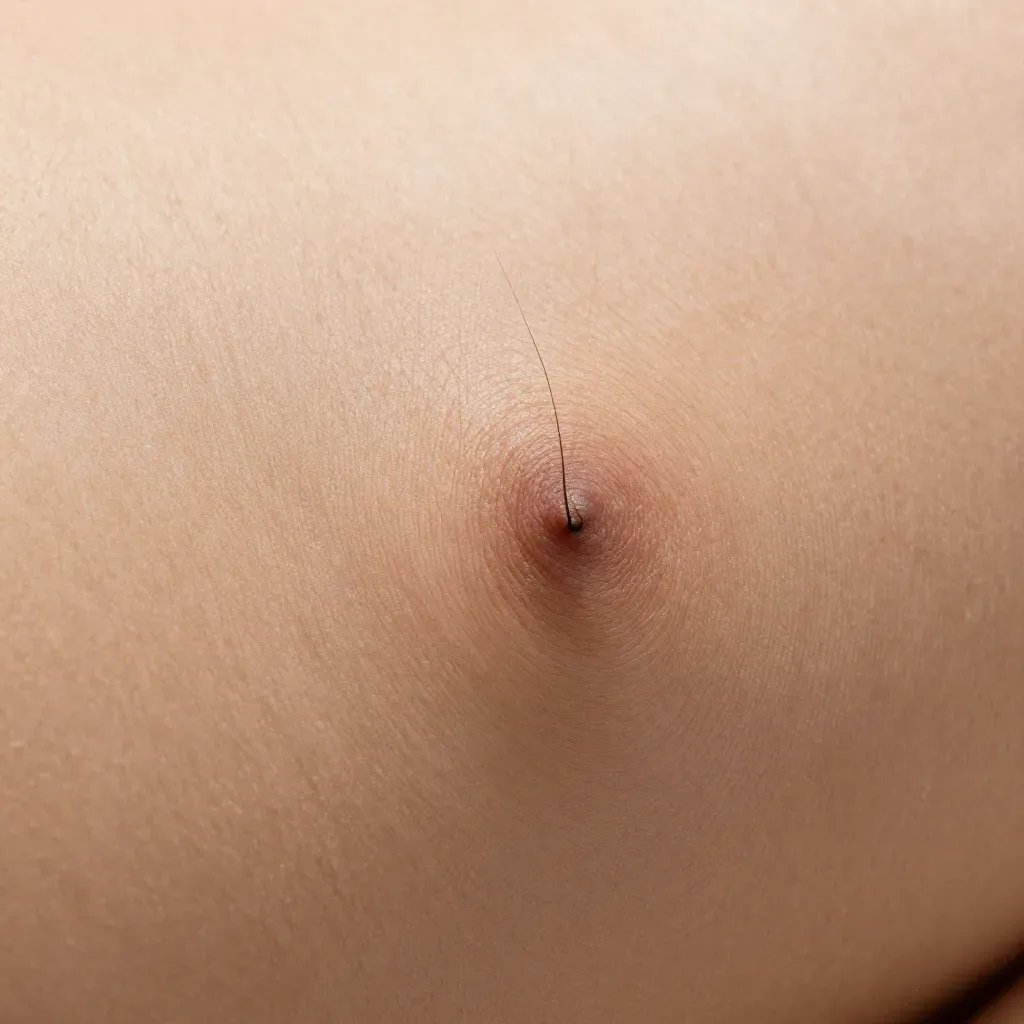
Visible bump | A small, red or skin-colored papule, often with a dark spot (the trapped hair) at its center. |
Itching and tenderness | The affected area feels irritated, sore, or itchy to the touch. |
Rash-like cluster | Multiple ingrown hairs can cause a patch of irritated, inflamed skin (pseudofolliculitis barbae). |
Pus or drainage | Sign of infection. The bump may become a larger, painful cyst filled with yellow or white pus. |
Hyperpigmentation | Dark spots left behind after the inflammation heals, especially common in darker skin tones. |
High-Risk Indicators
- Hair appears to grow sideways or curl back into the skin immediately after removal.
- Bumps recur in the same spots after every shave or wax.
- Persistent redness, swelling, or warmth around a bump indicates infection.
- Feeling a persistent, gritty texture under the skin even after exfoliation.
Use safe removal techniques for ingrown underarm hairs
Preparation Before Removal
- Wash hands thoroughly with antibacterial soap for at least 30 seconds to eliminate bacteria
- Gather all tools including tweezers, washcloth, and ointment then sterilize them with 70% rubbing alcohol
- Take a warm shower or apply a damp warm compress for 10 minutes to soften the skin and open hair follicles
- Ensure good lighting and position a mirror for clear visibility of the underarm area
- Pat the area completely dry with a clean towel before beginning the removal process
Step-by-Step Removal Process
- Cleanse the affected area with antibacterial soap and warm water to remove bacteria and sweat
- Apply warm compress for 5-10 minutes to further soften skin and open pores for easier access
- Gently exfoliate using a soft washcloth or salicylic acid pad to remove dead skin cells blocking the hair
- Sterilize pointed tweezers with rubbing alcohol for at least 30 seconds and let them air dry
- Locate the hair loop visible at the bump's surface using good lighting
- Carefully insert the tweezer tip under the hair loop and lift it up gently without digging into skin
- Do not pull the entire hair out—just lift it above skin level to release the trapped end
- Allow the hair to release naturally from the follicle rather than forcing it
- If needed, trim the hair flush with skin level using clean scissors sterilized with alcohol
- Apply a thin layer of antibiotic ointment or benzoyl peroxide cream to prevent infection
- Keep the area clean and avoid deodorant or antiperspirant for 24 hours to prevent irritation
Essential Tools Checklist
Tool | Purpose |
|---|---|
Pointed tweezers | Precision lifting of hair loops without causing additional skin damage |
Soft washcloth | Physical exfoliation to clear dead skin cells from the surface |
Salicylic acid (2%) | Chemical exfoliation that penetrates and unclogs blocked follicles |
Rubbing alcohol (70%) | Complete sterilization of all tools to prevent bacterial infection |
Antibiotic ointment | Post-removal infection prevention and accelerated healing |
Critical Warning Signs to Stop
- Bump grows larger than a pea or becomes extremely painful to touch
- Spreading redness, warmth, or red streaks appear indicating infection
- Pus drains from the bump and doesn't improve within 2-3 days of treatment
- You develop fever, chills, or swollen lymph nodes in the armpit area
- Hair remains trapped after 3-4 days of consistent home treatment
- Multiple bumps cluster together forming a large, painful mass
- Any sign of MRSA infection including rapid swelling and severe pain
Apply effective treatments for infected armpit bumps
Immediate Actions for Suspected Infection
- Apply a clean warm compress for 10-15 minutes, 3-4 times daily to increase blood flow and promote drainage
- Wash the area gently with antibacterial soap and lukewarm water twice daily, pat dry completely
- Stop all hair removal in the area immediately—no shaving, waxing, or plucking
- Wear loose, breathable cotton clothing to minimize friction and moisture buildup
- Do not pop, squeeze, or pick at the bump—this forces bacteria deeper and worsens infection
Topical Treatment Options
Treatment Type | Active Ingredients | Use Case | Frequency |
|---|---|---|---|
Over-the-counter antibiotic ointment | Bacitracin, Neomycin, Polymyxin B | Minor redness, early infection signs | Apply 2-3x daily after cleaning |
Benzoyl peroxide (2.5-5%) | Benzoyl peroxide | Kills bacteria, reduces inflammation | Apply once daily, may bleach fabrics |
Prescription topical antibiotic | Clindamycin, Mupirocin | Moderate infection, pus present | Apply 2x daily for 7-10 days |
Hydrocortisone cream (1%) | Hydrocortisone | Severe redness and swelling (short-term only) | Apply once daily for max 3 days |
Oral Antibiotics for Systemic Infection
- Required if infection spreads beyond the bump—red streaks, fever, swollen lymph nodes
- Common prescriptions include cephalexin, dicloxacillin, or clindamycin for 5-7 days
- Complete the full course even if symptoms improve to prevent antibiotic resistance
- Take with food or milk to reduce stomach upset, and stay hydrated
- Seek medical evaluation for oral antibiotics—do not use leftover prescriptions
Professional Medical Interventions
- Incision and drainage: A doctor makes a small cut to release pus under sterile conditions
- Laser hair removal: Eliminates the follicle to prevent recurrent ingrowns and infections
- Prescription-strength retinoids (tretinoin): Used off-label to speed cell turnover and free trapped hairs
- Culture and sensitivity test: Swab of pus to identify exact bacteria and targeted antibiotic
Prevention During Healing
- Keep the area clean and dry—use a separate clean towel for the armpit
- Apply a non-comedogenic, fragrance-free moisturizer to repair skin barrier
- Use an aluminum-free deodorant only after the bump is fully healed and closed
- Exfoliate gently with a chemical exfoliant (salicylic acid) once the infection clears
- Consider switching to electric razor or single-blade razor for future underarm hair removal
Prevent future ingrown hairs with proper shaving habits
Pre-Shave Skin Preparation
- Shave only after a warm shower or bath to soften hair and open pores for at least 5 minutes
- Apply a pre-shave oil or gel specifically formulated for sensitive skin to create a protective barrier
- Gently exfoliate 24 hours before shaving using a chemical exfoliant with salicylic acid (2%)
- Ensure armpits are completely clean and dry before applying any shaving product
- Never shave dry skin—always use sufficient lubrication to minimize friction
Optimal Shaving Technique
Step | Action | Why It Matters |
|---|---|---|
1. Direction | Shave with the grain, not against it | Reduces hair tip sharpness and prevents re-entry into skin |
2. Pressure | Use zero pressure—let the razor glide | Heavy force cuts hair below skin level, increasing ingrown risk |
3. Stroke Length | Use short, controlled strokes (1-2 inches max) | Prevents razor clogging and uneven cutting |
4. Rinse | Rinse blade after every stroke | Removes hair and product buildup that drags on skin |
5. Stretch | Do not stretch or pull skin taut | Taut skin cuts hair too short, promoting sideways growth |
Razor Selection Guide
- Single-blade safety razor: Cuts hair just above skin surface, reducing sharp, trapped tips
- Electric foil shaver: Trims hair without cutting below skin; ideal for sensitive underarms
- Avoid multi-blade cartridges: Each blade pulls and cuts hair progressively shorter, increasing ingrown risk
- Always use a sharp blade: Dull blades tug hair and require multiple passes, causing irritation
- Disposable razors: Single-use only—never reuse, as edges become microscopically dull
Post-Shave Protocol
- Rinse with cool water to close pores, then pat dry—do not rub
- Apply an alcohol-free, fragrance-free moisturizer with ceramides to repair skin barrier
- Use a dedicated after-shave balm containing witch hazel or aloe vera to soothe inflammation
- Wait at least 12 hours before applying deodorant or antiperspirant
- Wear loose cotton clothing for 24 hours to allow skin to recover without friction
Critical Mistakes to Avoid
- Shaving over the same area more than twice in one session
- Stretching skin to get a "closer" shave
- Using shared or old razors (replace blades after 3-5 uses)
- Skipping exfoliation between shaves (2-3 times weekly with a gentle chemical exfoliant)
- Shaving when skin is irritated, sunburned, or has active ingrown hairs
Consider laser hair removal for permanent armpit smoothness
How Laser Hair Removal Prevents Ingrown Hairs
- Targets and destroys the hair follicle itself, preventing future hair growth entirely
- Eliminates the root cause of ingrown hairs—no hair means no trapped hairs beneath skin
- Reduces hair density with each session, making remaining hairs thinner and less likely to curl
- Decreases overall hair growth cycle disruptions that lead to irregular regrowth patterns
- Provides a permanent solution for chronic ingrown hair sufferers after completing a full treatment series
Treatment Process Overview
Stage | Details |
|---|---|
Session count | 6-8 treatments spaced 4-6 weeks apart for optimal results |
Session duration | 10-15 minutes per underarm area |
Pain level | Mild discomfort often described as a rubber band snap sensation |
Results timeline | Noticeable reduction after 3-4 sessions, permanent reduction after full series |
Maintenance | Annual touch-up sessions may be needed for some individuals |
Ideal Candidates for Underarm Laser Treatment
- Individuals with recurring ingrown hairs despite proper shaving techniques
- Those experiencing razor bumps, dark spots, or skin irritation from regular hair removal
- People seeking long-term cost savings compared to ongoing razors, waxing, or creams
- Adults with lighter skin tones and darker hair (laser targets melanin pigment)
- Individuals willing to commit to a series of treatments for permanent results
- Those with sensitive underarm skin that reacts poorly to shaving or waxing
Pre-Treatment Requirements
- Avoid sun exposure and tanning beds for 2-4 weeks before treatment
- Stop using retinoids, AHAs, BHAs, and exfoliating products one week prior
- Shave the area 24-48 hours before your appointment (not wax or pluck)
- Avoid deodorant, antiperspirant, and lotions on the day of treatment
- Disclose any medications, skin conditions, or history of keloid scarring
Post-Treatment Care
- Apply cool compresses immediately after treatment to reduce swelling and discomfort
- Use fragrance-free moisturizer and gentle cleanser for 24-48 hours
- Avoid deodorant, heavy lotions, and tight clothing for 24 hours
- Stay out of direct sunlight and use SPF 30+ sunscreen on treated areas
- Avoid hot showers, saunas, and intense exercise for 24-48 hours
- Do not pick, scratch, or exfoliate the treated area while it heals
Cost Considerations
Option | Average Cost | Notes |
|---|---|---|
Single session | $150-$300 | Varies by location and provider expertise |
Full series (6-8 sessions) | $900-$1,500 | Most providers offer package discounts |
Annual touch-up | $100-$200 | Needed only for maintenance in some cases |
At-home diode laser device | $200-$600 | Requires more sessions but eliminates salon costs |