Table of Contents
Ingrown hair on penile shaft looks like red bump after shaving.
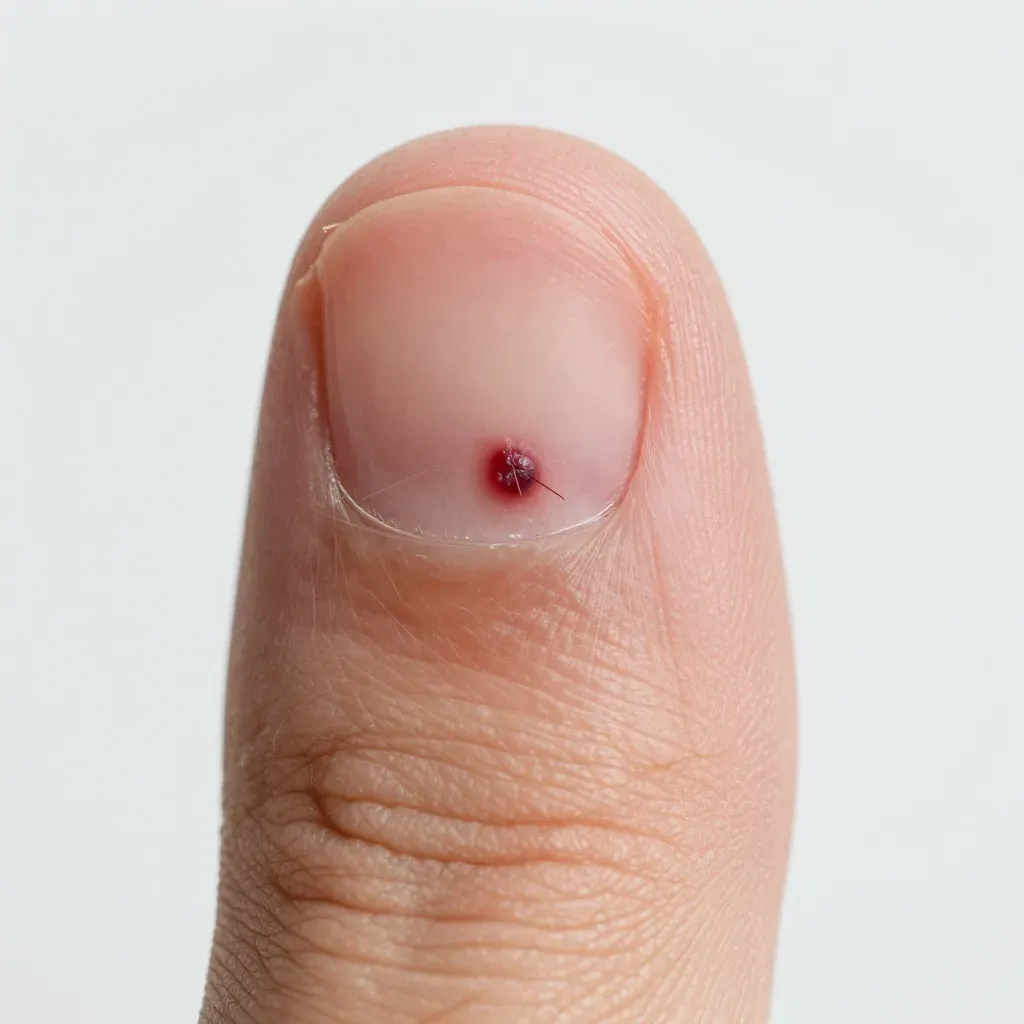
Find trapped hair visible under skin.
Apply warm compress 10-15 min 3-4 times daily.
Sterilize tweezers with alcohol.
Never squeeze bump.
Gently lift hair tip then pull in growth direction.
Clean area with antiseptic.
Apply antibiotic ointment twice daily for 3 days.
Wear loose cotton underwear.
Avoid sex until healed.
Prevent by shaving with hair direction using single-blade razor.
Change blades every 3-4 uses.
See doctor for increasing pain pus red streaks fever or if you have diabetes or weak immune system.
Question | Answer |
|---|---|
How do I identify ingrown hair on penile shaft? | Find red bump with visible hair trapped under skin after shaving. |
What is safest removal method? | Use warm compress then sterile tweezers to lift and pull hair in growth direction. |
What aftercare prevents infection? | Clean with antiseptic and apply antibiotic ointment twice daily for three days. |
How do I prevent future ingrown hairs? | Shave with hair direction using fresh single-blade razor. |
When must I see doctor? | See doctor for spreading redness pus fever or if diabetic or immunocompromised. |
Identify ingrown hair on penile shaft safely
Visual Signs
Normal Hair | Ingrown Hair |
|---|---|
Hair tip visible above skin | Hair curls back into skin |
Small, uniform follicle opening | Raised, red bump or pimple-like spot |
No inflammation | Skin around bump may be swollen, tender |
Symptoms
- Small red or skin-colored bump on penile shaft
- Pus-filled spot resembling a pimple
- Itching or mild pain at the site
- Hair may be visible beneath the bump surface
- tenderness when touched
Important Distinction
Look for a visible trapped hair. Ingrown hairs often follow a hair growth pattern. STI sores typically lack a hair and may be fluid-filled or ulcerated. If you have sexual risk factors or multiple unexplained bumps, get tested. A single isolated bump after shaving or waxing is more likely an ingrown hair.
When to See a Doctor
- Bump grows larger, becomes very painful, or warm to touch
- Pus is yellow-green or foul-smelling
- Red streaks spreading from the area
- Fever or chills
- Bump does not improve after a week of clean, dry care
- You cannot identify the cause with certainty
A doctor can safely differentiate and prescribe treatment if infected. For recurring issues, discuss long-term hair removal options.
Use warm compress and sterile tools for removal
Warm compress technique
Soak clean washcloth in warm (not hot) water. Wring out excess. Apply directly to bump for 10-15 minutes. Repeat 3-4 times daily. Heat softens skin and brings hair closer to surface. Never skip this step. It reduces trauma during extraction.
Sterile tools checklist
Tool | How to sterilize | Use |
|---|---|---|
Sharp-tipped tweezers | Boil 5 min or alcohol swab | Lift and pull hair |
Sterile needle/lancet | Alcohol swab, single-use only | Lift skin flap only |
Rubbing alcohol | Comes sterile | Clean skin and tools |
Cotton balls/swabs | Use new, untouched | Apply antiseptic |
Removal steps
- Wash hands with antibacterial soap for 30 seconds. Rinse well.
- Clean penile shaft area with mild soap and warm water. Pat completely dry with clean towel.
- Apply warm compress for full 10 minutes right before extraction.
- Sterilize tweezers: wipe with alcohol, pass through flame, or boil. Let cool.
- Examine bump under good lighting. Locate hair loop or dark spot.
- Gently grasp visible hair with tweezers. Pull in direction of growth.
- If hair is trapped: use sterile needle to lift thin skin layer just enough to free tip. Never puncture deep or create hole.
- Once hair tip is exposed, grasp firmly and pull entire hair out smoothly.
- Immediately dab area with alcohol or antiseptic. Apply thin layer of antibiotic ointment.
Critical safety rules
- Stop immediately if you cannot see hair after one attempt
- Stop if bleeding is more than a few drops or pain is sharp
- Do not attempt removal if you have diabetes, poor circulation, or immune suppression
- Limit to one gentle try per day. Multiple attempts damage skin and increase scar risk
- Deeply embedded hairs require professional extraction
Clean area thoroughly after extraction
Immediate cleaning steps
Right after hair removal, clean site again. Use clean cotton swab with alcohol or antiseptic solution. Dab gently, do not rub. Removes bacteria and blood. Let air dry 30 seconds. Apply direct pressure with clean gauze if bleeding persists more than a minute.
Apply protective layer
Spread thin layer of antibiotic ointment like bacitracin or neosporin. Use clean fingertip or fresh swab. Do not double-dip. Cover with sterile bandage if area rubs against clothing. Change bandage daily. Keep area dry and clean. Remove bandage at night if possible to let skin breathe.
Daily care routine for 3 days
- Wash gently with mild unscented soap twice daily
- Pat dry with clean towel, never rub
- Reapply antibiotic ointment after each wash
- Wear loose cotton underwear to reduce friction
- Avoid sexual activity until fully healed (2-3 days minimum)
- Skip gym, cycling, tight pants during healing
Products to avoid completely
Avoid | Why it harms healing |
|---|---|
Hydrogen peroxide | Delays healing, damages new tissue |
Alcohol after first day | Dries skin, causes irritation |
Fragranced lotions or powders | Contains irritants, allergens |
Tight synthetic underwear | Traps moisture, increases infection risk |
Exfoliants or scrubs | Disrupts healing skin |
Monitor for infection signs
Timeframe | Normal healing | Warning signs |
|---|---|---|
24 hours | Slight pinkness, small scab | Increasing pain, spreading redness |
48 hours | Less tender, scab firm | Yellow-green pus, foul odor |
72 hours | Scab starts to shrink | Red streaks, fever, severe swelling |
- Check area twice daily in good light
- Take photo daily to track changes
- Stop home care and see doctor if any warning signs appear
- Early treatment prevents serious infection and scarring
Prevent future ingrown hairs with proper shaving technique
Pre-shave skin prep
Wash area with warm water and mild soap. Soften hair with warm compress for 2 minutes. Apply generous amount of shaving cream or gel. Let sit 1 minute before shaving. Never dry shave. Dry shaving causes 90% of ingrown hairs.
Shaving technique
Do | Don't |
|---|---|
Shave with hair growth direction | Shave against grain |
Use light, short strokes | Press hard or repeat strokes |
Rinse blade after each stroke | Shave over same spot multiple times |
Stretch skin taut gently | Pull or tug aggressively |
Tool requirements
- Use single-blade or safety razor. Multi-blade razors cut too close.
- Change blade after 3-4 uses. Dull blades cause ingrown hairs.
- Clean razor with alcohol before each use.
- Never share razors.
Post-shave care
Rinse thoroughly with cool water. Pat dry with clean towel. Apply fragrance-free moisturizer or aloe vera gel. Avoid tight underwear for 24 hours. Let skin breathe. Skip sexual activity for 12 hours after shaving.
Alternative methods
- Laser hair removal: Permanent solution after 6-8 sessions
- Waxing: Pulls hair from root, reduces curl-back but causes initial irritation
- Depilatory creams: Use only if labeled safe for genital area
Products to avoid
Avoid | Reason |
|---|---|
Scented shaving creams | Contains irritants |
Alcohol-based aftershave | Dries and irritates skin |
Exfoliating scrubs | Creates micro-tears |
Powders with talc | Clogs follicles |
Seek medical help for signs of infection
Critical infection signs
Sign | Action needed |
|---|---|
Increasing pain or swelling after 48 hours | Schedule same-day appointment |
Pus turns yellow-green or smells foul | See doctor within 24 hours |
Red streaks spreading from bump | Go to urgent care immediately |
Area feels hot to touch | Seek medical evaluation |
Fever, chills, or body aches | Emergency room visit |
Bump grows larger or hardens | Doctor visit within 24 hours |
High-risk conditions
- Diabetes (any type)
- HIV/AIDS or immunosuppression
- Poor circulation or peripheral artery disease
- History of MRSA infections
- Currently taking chemotherapy or steroids
- On blood thinners
What the doctor will do
- Examine area and assess infection severity
- Take culture sample to identify bacteria
- Prescribe oral antibiotics if needed
- Perform professional incision and drainage if abscess present
- Check for underlying skin conditions
- Recommend permanent hair removal options
Typical treatment options
Treatment | When used | Duration |
|---|---|---|
Oral antibiotics (e.g., cephalexin) | Moderate to severe infection | 7-10 days |
Topical mupirocin ointment | Mild localized infection | 5-7 days |
Incision and drainage | Large abscess with pus | One procedure |
Tetanus booster | If skin deeply punctured | Single shot |
Cost considerations
Urgent care visit: $100-$200 with insurance. Emergency room: $500-$1500+. Antibiotics: $10-$50 generic. Professional extraction: $150-$300. These costs are far less than treating sepsis or permanent scarring from delayed care.